Legacy GUI FRAME Migration
The Legacy GUI FRAME Migration utility can be launched from the SmartComponent Library Desktop and supports developers while migrating existing ABL GUI or TTY FRAME widgets and their contained field-level widgets to GUI for .NET SmartViewer Controls, Angular JS views or Kendo UI Builder.
The utility parses the existing procedure files (.p or .w) using proparse. There is not need to be able to execute the legacy program from within the tool as the tool does NOT need to traverse the widget-tree of the FRAME.
Configuration
Using the Options command in the bottom of the File Ribbon Tab developers can define a services.xml file (Services and the Service Container) which will be loaded by the utiltiy when it's started.
The Legacy GUI FRAME Migration utility can be customized through these services:
| Service Interface Name | Description |
|---|---|
| Consultingwerk.Studio.LegacyGuiMigration.Frame.IAblFrameMigrationFormCustomizer | Customization Interface, Service invoked at startup, allows customization of the utility including the Form and Toolbar. |
| Consultingwerk.Studio.LegacyGuiMigration.Frame.IAblFrameMigrationPreProcessor | Allows pre-processing the output of the FRAME parser before it is presented to the user. Allows to modify the IsSelected and AlternativeControlType fields of the ttSelectedFrameWidget temp-table records. |
| Consultingwerk.Studio.LegacyGuiMigration.Frame.IFrameParserPostProcessor | Allows to post-process the FrameParser output before presenting it to the user. |
During code generation, the utilties uses template files in a very similar way as the Business Entity Designer's code generator. The location of the template files is configurated in the Business Entity Designer Settings.
The default location for the templates is the folder: Consultingwerk\BusinessEntityDesigner\Generator\Templates\UI
Opening existing ABL Windows
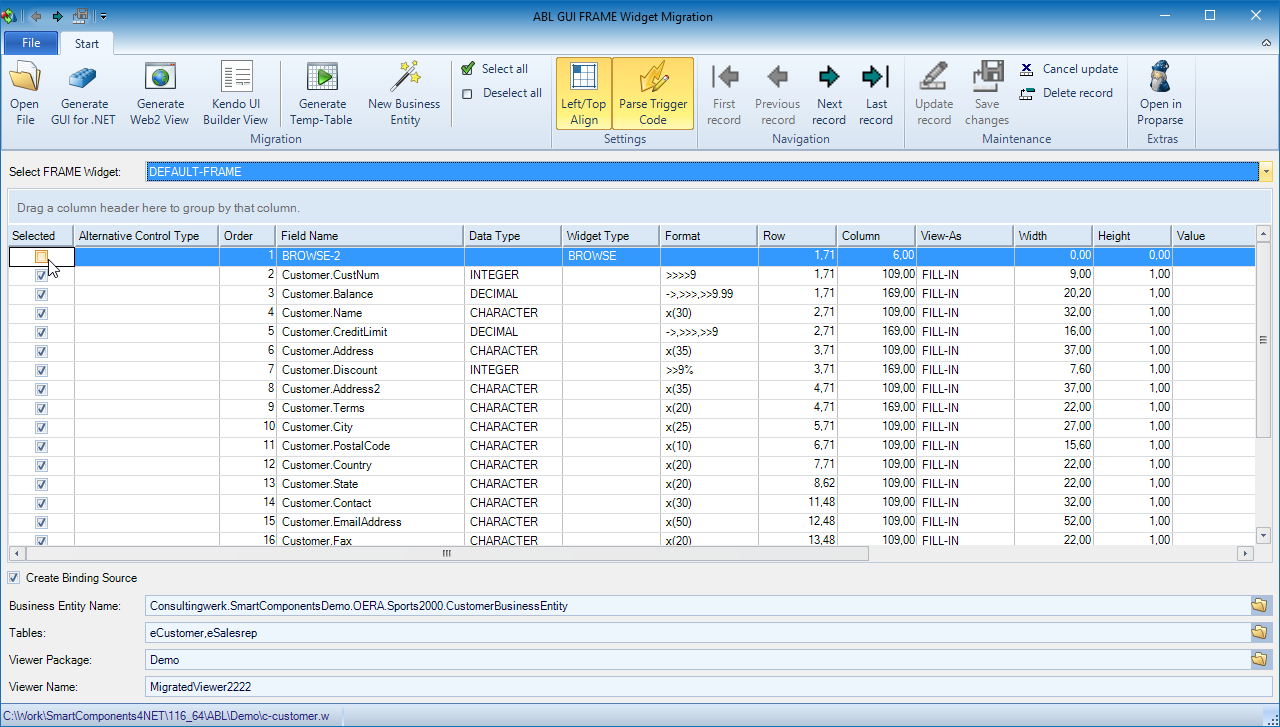
Developers can open existing ABL programs using the Open File tool in the Ribbon.

Once opened the tool will seek FRAME definitions in the existing ABL program. The Select Frame Widget combo-box will then contain the names of all FRAME widgets found during the parsing.

Once a FRAME has been selected from the combo-box, the utility will analyze the program for all widgets contained on that frame.
Selecting widgets to convert
By checking or unchecking the Selected flag on the row representing a widget developers can include or exclude widgets from the migration process.
While parsing the FRAME for widgets the utility has already predetermined which widges should be part of the resulting GUI's. As BROWSE widgets are typically seperate objects and not contained in the same objects as the field level widgets, BROWSE widgets are excluded by default.
The automatic selection and deselection of widgets can be customized using the Consultingwerk.Studio.LegacyGuiMigration.Frame.IAblFrameMigrationPreProcessor service instance (see Configuration).
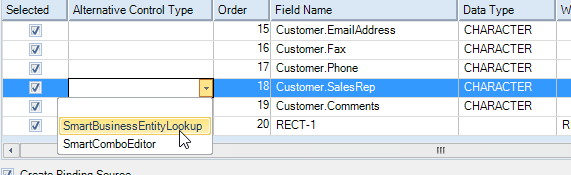
Another relevant setting in the list of widgets is the alternative control type. As we cannot distinguish in which way a widgets provided advanced user input, it may be required to change certain widgets lookup or combo-box controls in the migrated application.
Options in the Ribbon
| Ribbon Tool | Description |
|---|---|
| Generate Temp-Table | Generates a Temp-Table definition in an include file that matches the selected widgets found in the FRAME |
| New Business Entity | Launches the New Business Entity Wizard which allows to create a Business Entity which can be used to provide data to the generated SmartViewer Control. In the Wizard, Developers will need to specify the package in which the Business Entity will be created. The wizard will then start the Business Entity Designer from where the Business Entity can be generated. The wizard does only create the Business Entity model and no actual source code |
| Select all | Allows to select all widgets for inclusion in the migration process |
| Deselect all | Allows to deselect all widgets from inclusion in the migration process |
| Left/Top Align | Aligns all migrated widgets to the top left corner of the migrated user interface. Useful when widgets such as the BROWSE widget in the first screenshot are excluded from the migration to fill the gaps |
| Parse Trigger code | Parses the Trigger Code during migration, see below |
| Open in Proparse | Opens the selected ABL procedure in the Proparse TreeView |
Generating GUI for .NET SmartViewer Controls
When creating GUI for .NET SmartViewer Controls that should support displaying and editing data provided by a Business Entity, it's required to define the name and tables (EntityTable, EntityView) to bind the visual controls to. This can be done in the bottom part of the utilities user interface:

The name of the generated ABL SmartViewer class is controlled in the bottom part of the utility as well. Developers need to select the target package (relative folder) and the viewer name as the class name.

After choosing the Generate GUI for .NET button in the Ribbon, the following GUI for .NET SmartViewer is generated.

The RECTANGLE widget RECT-1 as migrated into an UltraGroupBox control with the controls that in the ABL frame were just placed within the boundaries of the RECTANGLE now beeing truely contained withint the UltraGroupBox control.

Migrating ABL Trigger Code
The utility supports the migration of trigger code to matching event handler methods in the GUI for .NET class file. Currently these events are supported:
| ABL Event name | GUI for .NET Event name |
|---|---|
| CLICK | Click |
| LEAVE | Validating |
| VALUE-CHANGED | ValueChanged |
The following is an example of an ABL Trigger Block in the original program:
&Scoped-define SELF-NAME Customer.Country
&ANALYZE-SUSPEND _UIB-CODE-BLOCK _CONTROL Customer.Country C-Win
ON VALUE-CHANGED OF Customer.Country IN FRAME DEFAULT-FRAME /* Country */
DO:
    DO WITH FRAME {&frame-name}:

        IF Customer.Country:SCREEN-VALUE = "USA" THEN
            Customer.State:VISIBLE = TRUE .
        ELSE
            Customer.State:VISIBLE = FALSE .


    END.
END.

/* _UIB-CODE-BLOCK-END */
&ANALYZE-RESUME
The utility will produce the following event subscription in the InitializeComponent Method of the SmartViewer control:
THIS-OBJECT:eCustomer_Country:ValueChanged:Subscribe(THIS-OBJECT:eCustomer_Country_ValueChanged).
And the following event handler method:
/*------------------------------------------------------------------------------
    Purpose: Event handler or the ValueChanged event of the eCustomer_Country
    Notes:
    @param sender The reference to the control that raised the event
    @param e The System.EventArgs with the data for this event
------------------------------------------------------------------------------*/
METHOD PRIVATE VOID eCustomer_Country_ValueChanged (sender AS System.Object, e AS System.EventArgs):

    /* Trigger code from ON VALUE-CHANGED OF Customer.Country IN FRAME DEFAULT-FRAME
       C:\Work\SmartComponents4NET\116_64\ABL\Demo\c-customer.w - 19.03.2017 11:35:54

    DEFINE VARIABLE Customer_Country AS Consultingwerk.Windows.LegacyGuiMigration.Widgets.IWidgetFacade NO-UNDO .
    DEFINE VARIABLE Customer_State AS Consultingwerk.Windows.LegacyGuiMigration.Widgets.IWidgetFacade NO-UNDO .

    Customer_Country = Consultingwerk.Windows.LegacyGuiMigration.Widgets.Infragistics.InfragisticsWidgetFactory:FromControl (THIS-OBJECT:eCustomer_Country) .
    Customer_State = Consultingwerk.Windows.LegacyGuiMigration.Widgets.Infragistics.InfragisticsWidgetFactory:FromControl (THIS-OBJECT:eCustomer_State) .

    DO WITH FRAME DEFAULT-FRAME:

        IF Customer.Country:SCREEN-VALUE = "USA" THEN
            Customer.State:VISIBLE = TRUE .
        ELSE
            Customer.State:VISIBLE = FALSE .


    END.
    */

END METHOD.
Editing the generated event handler code
The generated event handler code contains the original trigger code in a comment. The generated event handler does also contain code which defines and initializes an IWidgetFacade instance for every widget accessed in the original trigger code.
The IWidgetFacade instance provides a very simple way of rewriting code which used to access ABL widgets as it provides the same interface (same property names) to typical ABL widget attributes.
After uncommenting the code block and replacing the widget references like Customer.Country with the reference of the widget facade Customer_County the migrated code is fully functional. It's also recommended to remove the DO WITH FRAME block, as GUI for .NET does not use FRAME scoping in that way.
    /*------------------------------------------------------------------------------
        Purpose: Event handler or the ValueChanged event of the eCustomer_Country
        Notes:
        @param sender The reference to the control that raised the event
        @param e The System.EventArgs with the data for this event
    ------------------------------------------------------------------------------*/
    METHOD PRIVATE VOID eCustomer_Country_ValueChanged (sender AS System.Object, e AS System.EventArgs):

        /* Trigger code from ON VALUE-CHANGED OF Customer.Country IN FRAME DEFAULT-FRAME
           C:\Work\SmartComponents4NET\116_64\ABL\Demo\c-customer.w - 19.03.2017 11:35:54
        */

        DEFINE VARIABLE Customer_Country AS Consultingwerk.Windows.LegacyGuiMigration.Widgets.IWidgetFacade NO-UNDO .
        DEFINE VARIABLE Customer_State AS Consultingwerk.Windows.LegacyGuiMigration.Widgets.IWidgetFacade NO-UNDO .

        Customer_Country = Consultingwerk.Windows.LegacyGuiMigration.Widgets.Infragistics.InfragisticsWidgetFactory:FromControl (THIS-OBJECT:eCustomer_Country) .
        Customer_State = Consultingwerk.Windows.LegacyGuiMigration.Widgets.Infragistics.InfragisticsWidgetFactory:FromControl (THIS-OBJECT:eCustomer_State) .

        IF Customer_Country:SCREEN-VALUE = "USA" THEN
            Customer_State:VISIBLE = TRUE .
        ELSE
            Customer_State:VISIBLE = FALSE .

    END METHOD.
Generating Angular JS Views
Using the Generate Web2 View button in the Ribbon the utility does also support saving an html file representing the Angular JS template for a viewer with the same layout.
<form class="form-horizontal" style="margin-top: 0.5em; background-color: white; position:relative;">
    <fieldset>

        <label style="position:absolute; left:7px; top:17px;">Cust Num</label>
        <input type="text" id="eCustomer_CustNum" style="position:absolute; left:85px; top:12px; width: 59px;" ng-model="<%= get-field ('scope':U) %>.CustNum"></input>
        <label style="position:absolute; left:397px; top:17px;">Balance</label>
        <input type="text" id="eCustomer_Balance" style="position:absolute; left:475px; top:12px; width: 131px;" ng-model="<%= get-field ('scope':U) %>.Balance"></input>
        <label style="position:absolute; left:7px; top:42px;">Name</label>
        <input type="text" id="eCustomer_Name" style="position:absolute; left:85px; top:37px; width: 208px;" ng-model="<%= get-field ('scope':U) %>.Name"></input>
        <label style="position:absolute; left:397px; top:42px;">Credit Limit</label>
        <input type="text" id="eCustomer_CreditLimit" style="position:absolute; left:475px; top:37px; width: 104px;" ng-model="<%= get-field ('scope':U) %>.CreditLimit"></input>
        <label style="position:absolute; left:7px; top:67px;">Address</label>
        <input type="text" id="eCustomer_Address" style="position:absolute; left:85px; top:62px; width: 241px;" ng-model="<%= get-field ('scope':U) %>.Address"></input>
        <label style="position:absolute; left:397px; top:67px;">Discount</label>
        <input type="text" id="eCustomer_Discount" style="position:absolute; left:475px; top:62px; width: 49px;" ng-model="<%= get-field ('scope':U) %>.Discount"></input>
        <label style="position:absolute; left:7px; top:92px;">Address2</label>
        <input type="text" id="eCustomer_Address2" style="position:absolute; left:85px; top:88px; width: 241px;" ng-model="<%= get-field ('scope':U) %>.Address2"></input>
        <label style="position:absolute; left:397px; top:92px;">Terms</label>
        <input type="text" id="eCustomer_Terms" style="position:absolute; left:475px; top:88px; width: 143px;" ng-model="<%= get-field ('scope':U) %>.Terms"></input>
        <label style="position:absolute; left:7px; top:118px;">City</label>
        <input type="text" id="eCustomer_City" style="position:absolute; left:85px; top:113px; width: 176px;" ng-model="<%= get-field ('scope':U) %>.City"></input>
        <label style="position:absolute; left:7px; top:143px;">Postal Code</label>
        <input type="text" id="eCustomer_PostalCode" style="position:absolute; left:85px; top:138px; width: 101px;" ng-model="<%= get-field ('scope':U) %>.PostalCode"></input>
        <label style="position:absolute; left:7px; top:168px;">Country</label>
        <input type="text" id="eCustomer_Country" style="position:absolute; left:85px; top:163px; width: 143px;" ng-model="<%= get-field ('scope':U) %>.Country"></input>
        <label style="position:absolute; left:7px; top:191px;">State</label>
        <input type="text" id="eCustomer_State" style="position:absolute; left:85px; top:186px; width: 143px;" ng-model="<%= get-field ('scope':U) %>.State"></input>
        <label style="position:absolute; left:7px; top:263px;">Contact</label>
        <input type="text" id="eCustomer_Contact" style="position:absolute; left:85px; top:258px; width: 208px;" ng-model="<%= get-field ('scope':U) %>.Contact"></input>
        <label style="position:absolute; left:7px; top:288px;">Email</label>
        <input type="text" id="eCustomer_EmailAddress" style="position:absolute; left:85px; top:283px; width: 338px;" ng-model="<%= get-field ('scope':U) %>.EmailAddress"></input>
        <label style="position:absolute; left:7px; top:313px;">Fax</label>
        <input type="text" id="eCustomer_Fax" style="position:absolute; left:85px; top:308px; width: 143px;" ng-model="<%= get-field ('scope':U) %>.Fax"></input>
        <label style="position:absolute; left:7px; top:338px;">Phone</label>
        <input type="text" id="eCustomer_Phone" style="position:absolute; left:85px; top:334px; width: 143px;" ng-model="<%= get-field ('scope':U) %>.Phone"></input>
        <label style="position:absolute; left:7px; top:364px;">Sales Rep</label>
        <input type="text" id="eCustomer_SalesRep" style="position:absolute; left:85px; top:359px; width: 62px;" ng-model="<%= get-field ('scope':U) %>.SalesRep"></input>
        <label style="position:absolute; left:7px; top:407px;">Comments</label>
        <input type="text" id="eCustomer_Comments" style="position:absolute; left:85px; top:402px; width: 533px;" ng-model="<%= get-field ('scope':U) %>.Comments"></input>
        <div style="position:absolute; left:0px; top:0px; width:689px; height:486px; border:1px; solid #C0C0C0;"></div>


    </fieldset>
</form>
Generating Kendo UI Builder Views
The utility does also support converting the ABL GUI screens into Kendo UI Builder views. By clicking on the Kendo UI Builder View button in the Ribbon the following wizard is launched:
